

Architectural sketching is quick freehand drawing used to think through and communicate a building idea. To start, practise straight lines with your whole arm, set up a simple perspective with a horizon line at your eye level, vary line weight to show depth, and add shade and people for scale. This guide is for architecture students and beginners: it gives ten practical tips and then a four-step exercise sequence on one worked example, a simple corner building, that you can repeat on your own project.
It is easy to feel disheartened when the first sketches come out of proportion. Keep going: control of line and proportion comes from repetition, and the exercises below are designed to be repeated. If you also work digitally, these tips to improve your SketchUp skills easily cover the modelling side.
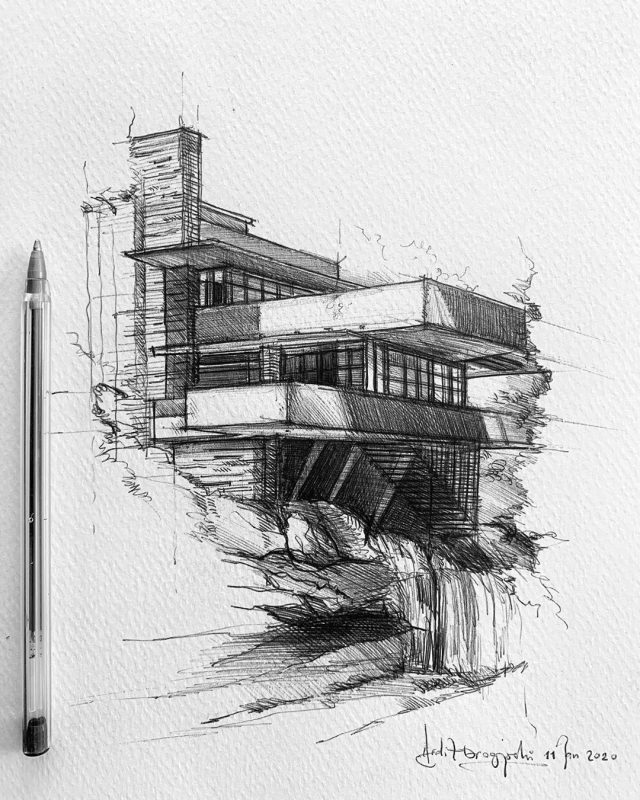
Falling water sketch by arditarts
What is an architectural sketch?
An architectural sketch is a fast, freehand drawing that records or tests a spatial idea. It is not a construction drawing: it leaves out detail so that one idea, a massing, a view, a light condition, reads clearly. That is why architecture sketches still matter even in offices that work entirely in BIM.
In practice, architectural sketching covers four broad kinds of drawing: concept sketches and diagrams that test an idea, observational sketches made on location, perspective sketches that show how a space will look, and freehand plans and sections drawn to rough scale. Edwin Lutyens’ drawing of the front and side elevations of the Cenotaph in London shows the last kind: a hand drawing with only the key dimensions, enough to fix the monument’s proportions.
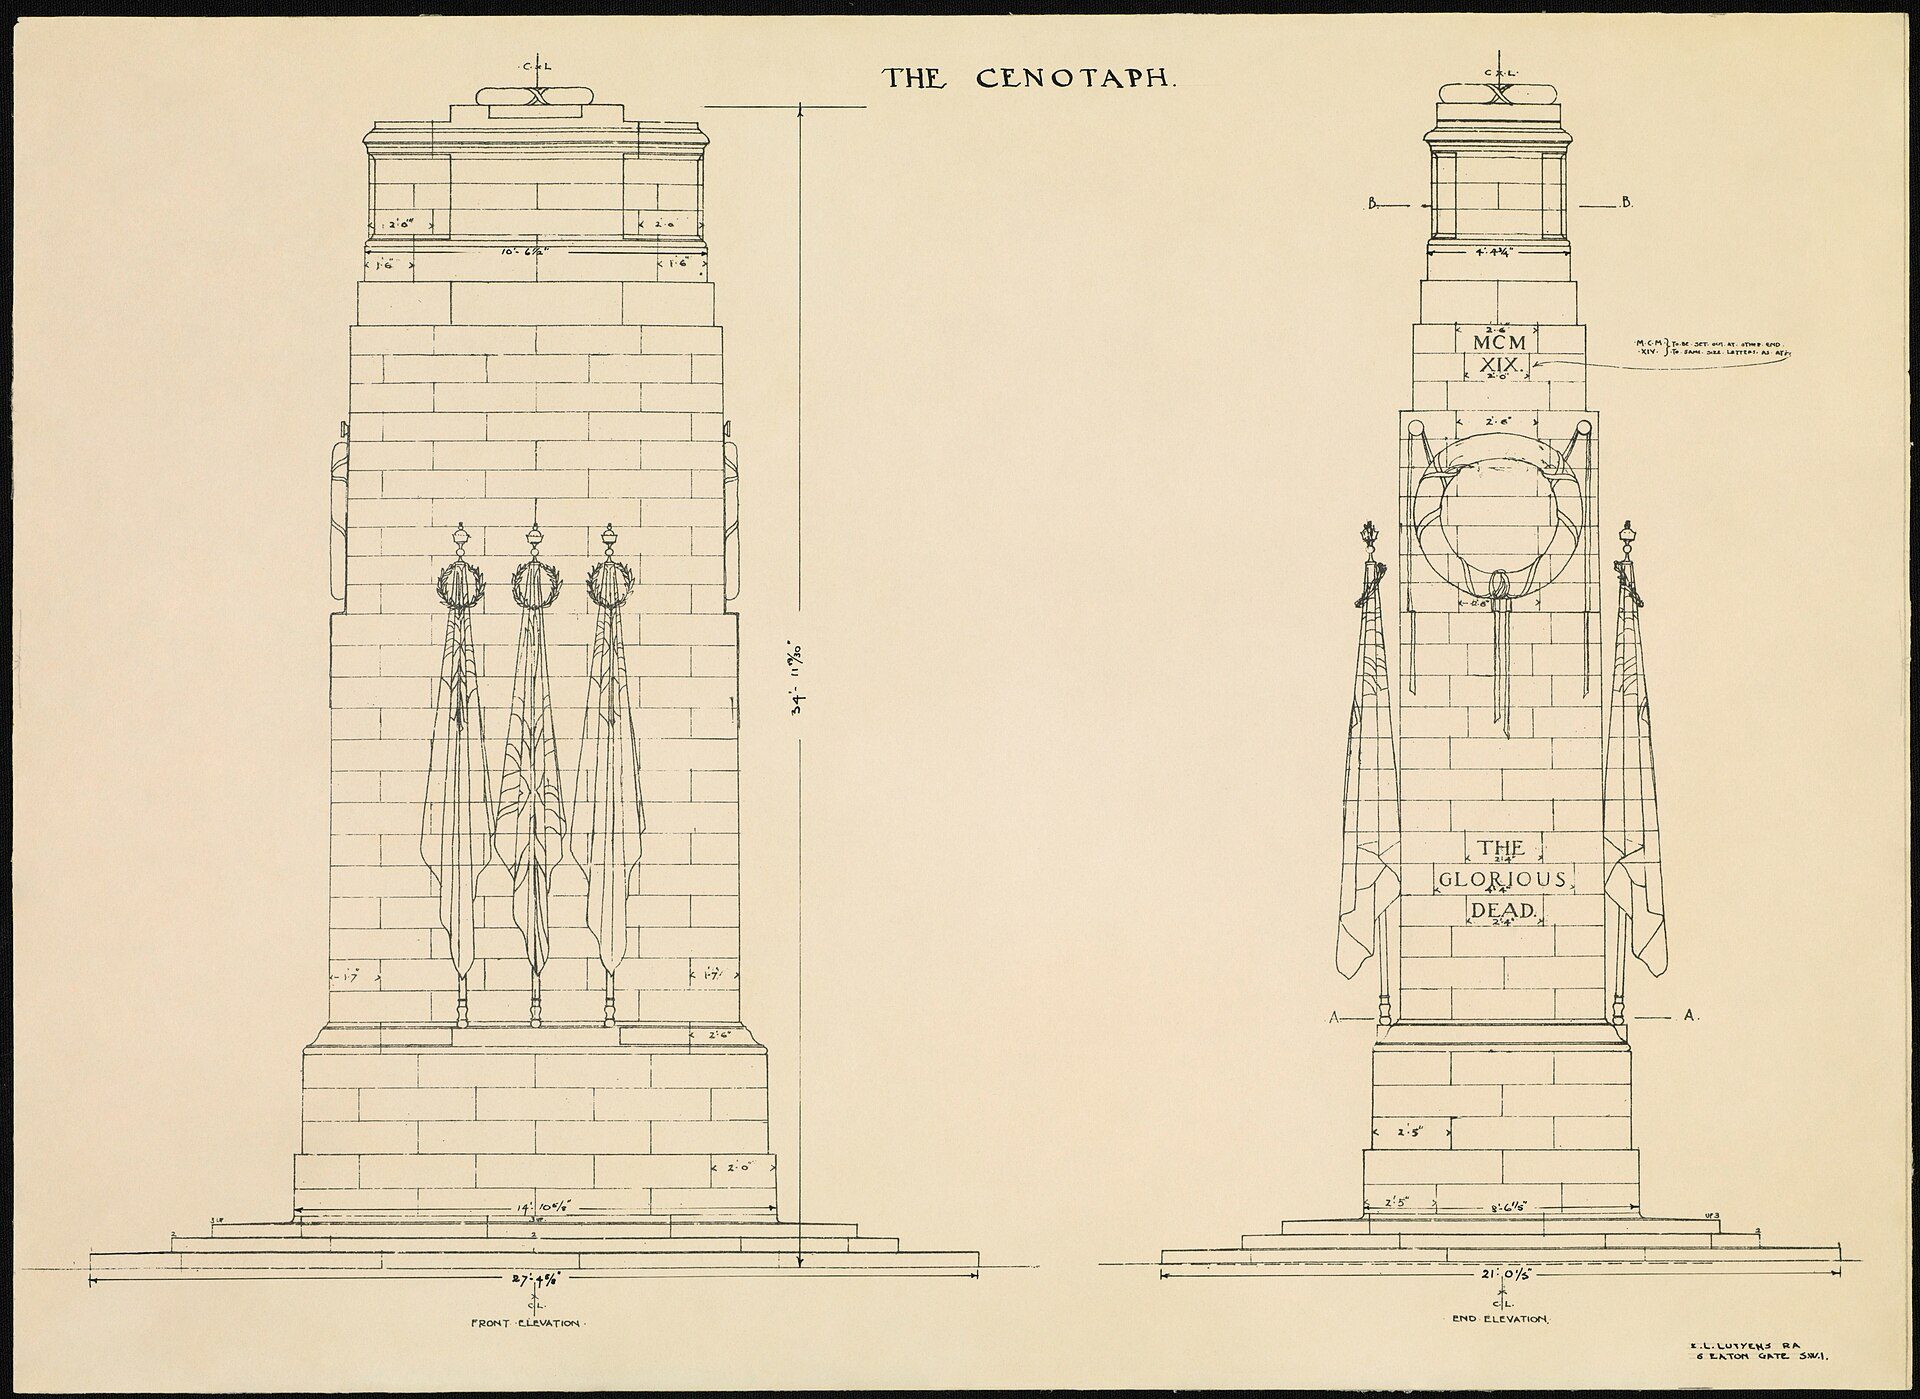
Edwin Lutyens' hand-drawn front and side elevations of the Cenotaph, London: a freehand drawing with only the key dimensions, enough to fix the proportions. Image: Edwin Lutyens (d. 1944), public domain, restored by Adam Cuerden, via Wikimedia Commons. Image: Edwin Lutyens / Adam Cuerden (Public domain (verified))
Architectural sketching tips
If you still prefer pencil and paper, the following tips will help any beginner overcome the most common problems in architectural sketching.
1. Move your whole arm, not your wrist
The architect Bob Borson advises beginners to “lock your wrist and elbow into a comfortable angle and only move your entire arm when sketching”, in his guide to improving your sketching on Architizer. Limiting the movement to the whole arm gives straighter lines; as you gain control you can relax the rule and bend the elbow, then the wrist. In the same guide he recommends pulling the pen across the page rather than pushing it, and a “hit-go-hit” stroke: press at the start, move, and press again at the end so each line has a clear beginning and end.
2. Change your grip to change the line
Hold the pencil close to the tip when you need control and precise, darker lines. Hold it further back for lighter, looser strokes in early layout lines and textures. Switching grip during one drawing is one of the simplest ways to separate construction lines from finished lines.
3. Diversify your lines
A lively sketch mixes thick and thin, light and dark lines. Practise with a range of pencil grades, for example from 3H (hard, light) to 6B (soft, dark), and by holding the pencil at different angles. Use line weight to convey depth: the nearest edges and the outline of a building against the sky are heaviest, distant and surface lines lightest. Borson calls these heavier outlines profile lines. For inspiration, see these 20 mind-blowing ink architectural sketches.
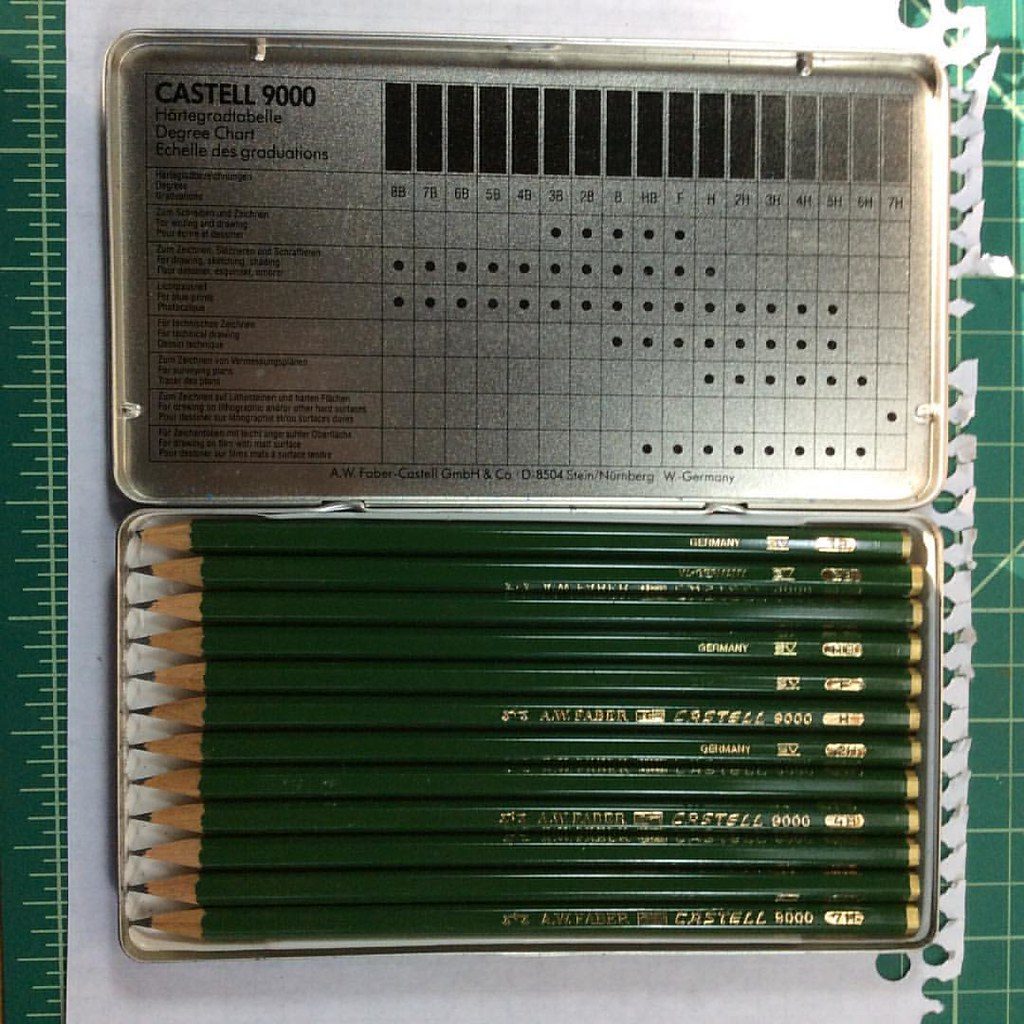
A set of drawing pencils from 3B to 7H, with the tin's chart showing how tone darkens from hard to soft grades. Photo: el cajon yacht club, CC BY 2.0, via Flickr/Openverse. el cajon yacht club, source, CC BY 2.0
4. Add some texture
When you add watercolour, do not wet the whole sheet. Leaving some paper dry and letting the pigment catch the grain of the paper gives a grainy, lively texture, and the white paper reads as light.
5. Avoid perfect symmetry
Balance matters in architectural sketching, but a perfectly symmetrical sketch can look static. Keep the main lines of a symmetrical façade symmetrical, then let trees, people, shadows and the viewpoint itself break the symmetry; a view slightly off the centre line is usually more informative than a dead-centre elevation.
6. Stay clear of smudging
Put a spare sheet of paper under your hand when shading so it does not drag graphite across the drawing. Work from left to right if you are right-handed and from right to left if you are left-handed. When you do want to soften a tone, blend it deliberately with a tissue or a blending stump.
7. Draw a soft sky
For a smooth graphite sky, shade a patch on a spare sheet with a soft pencil or charcoal, pick up the dust with a large blending stump, and lay it into the sky area. Then darken a few areas to mark the tops of clouds. Keep the sky lighter than the building so the outline still reads.
8. Check people and trees in silhouette
People and trees give scale, but only if they read at a glance. Test a figure or tree by tracing its outline on tracing paper and filling it in solid: if you can still tell a person walking from a person standing, or a palm from a broadleaf tree, the shape works. Keep figures simple; detailed faces distract from the architecture.
9. Flip the drawing to find errors
Draw on tracing paper, or hold the sheet up to a mirror, and look at the sketch in reverse. Seen backwards, errors in proportion and leaning verticals jump out because your eye no longer fills in what it expects. Tracing paper also lets you work in layers: Borson recommends tracing over an earlier sketch to refine the idea step by step.
10. Sketch from life, often
The fastest way to improve your architectural sketching is regular drawing from observation. The Urban Sketchers movement, founded on Flickr in 2007, puts it first in its manifesto: “We draw on location, indoors or out, capturing what we see from direct observation”, as quoted in Wikipedia’s entry on Urban Sketchers. Short daily sketches of real buildings, including the vernacular architecture around you, train proportion and perspective better than copying photographs.
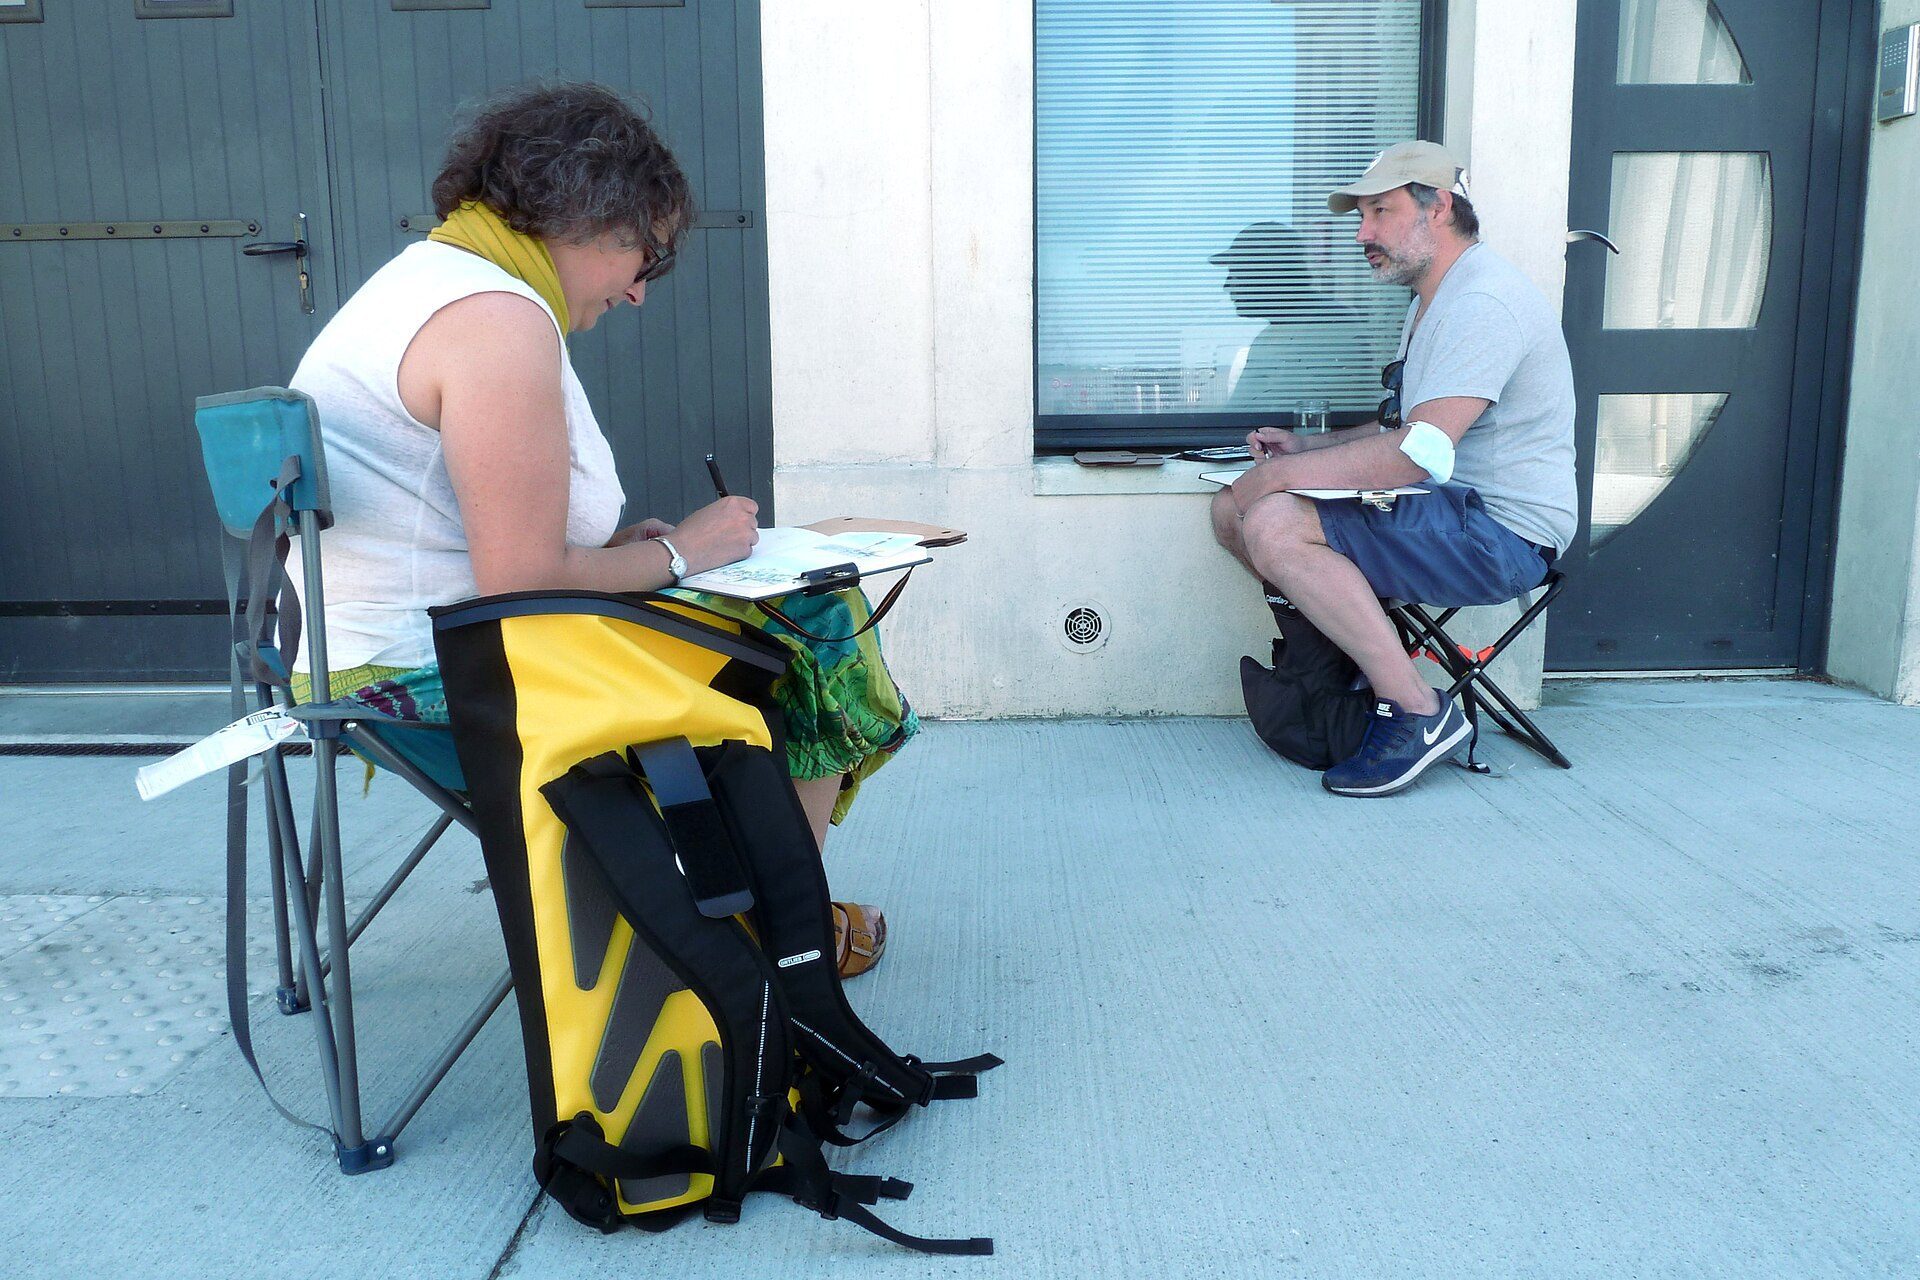
Urban sketchers at work on location in Paimbœuf, western France: regular drawing from observation trains proportion and perspective. Photo: Acere88, CC BY-SA 4.0, via Wikimedia Commons. Acere88, source, CC BY-SA 4.0
Step-by-step architectural sketching exercises: one worked example
The four exercises below build one drawing in stages: a two-storey corner building seen from across the street. The subject is hypothetical, so you can replace it with any simple building near you. Each step has a diagram for you to copy before you try it on your own subject. Allow about 15 minutes per step at first.
Step 1: Set up the perspective
Draw a horizontal line across the page: this is the horizon line, and it always sits at the viewer’s eye level. For a corner building seen at an angle, mark two vanishing points on that line, well apart and near the edges of the page. Draw the nearest vertical corner of the building first, then run its top and bottom edges back to each vanishing point. All vertical lines stay vertical. If the building looks distorted, move the vanishing points further apart.
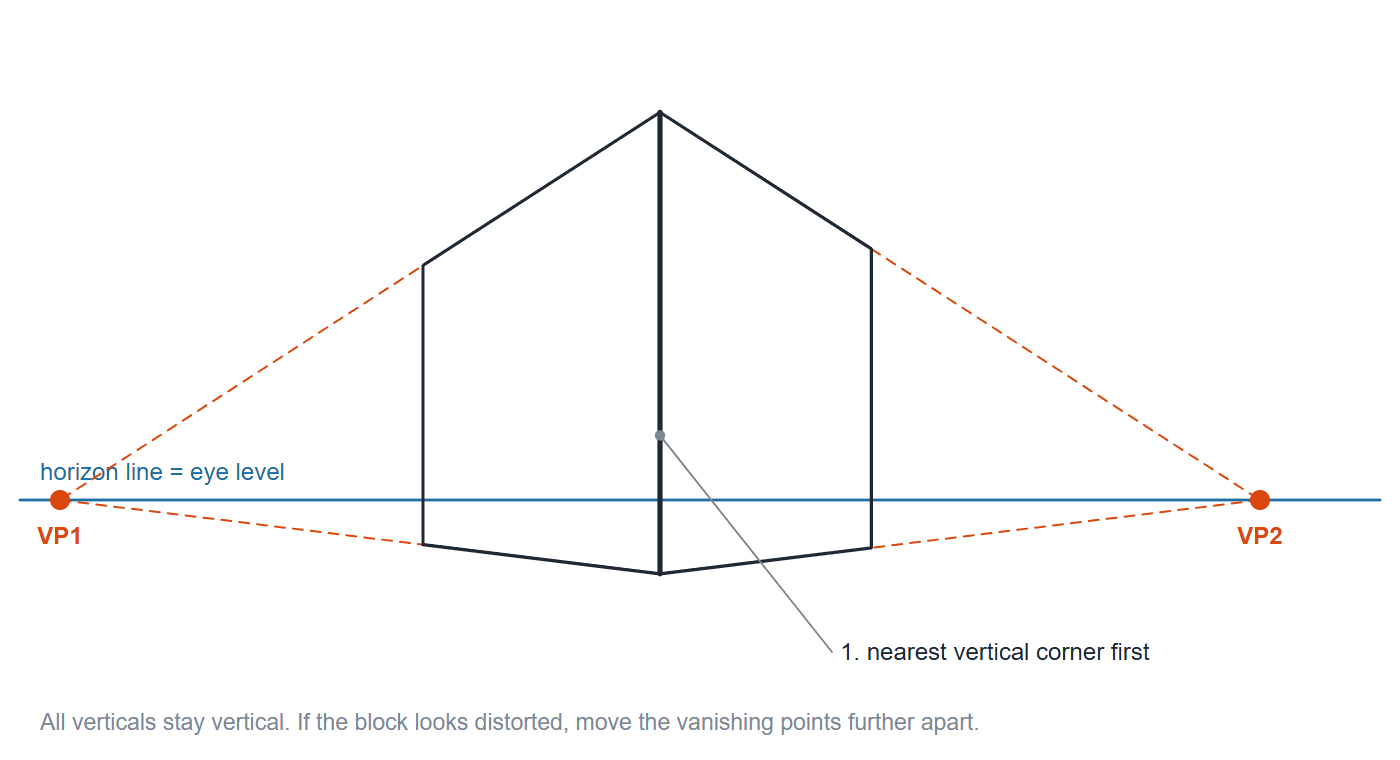
Step 1: the horizon line at eye level, two vanishing points near the page edges, and the nearest corner drawn first. Every top and bottom edge runs back to a vanishing point; verticals stay vertical. Diagram: Arch2O
When you draw from life, a simple viewing aid helps you see these converging lines. Vincent van Gogh used a wooden perspective frame strung with threads and sketched it on the back of one of his drawings.
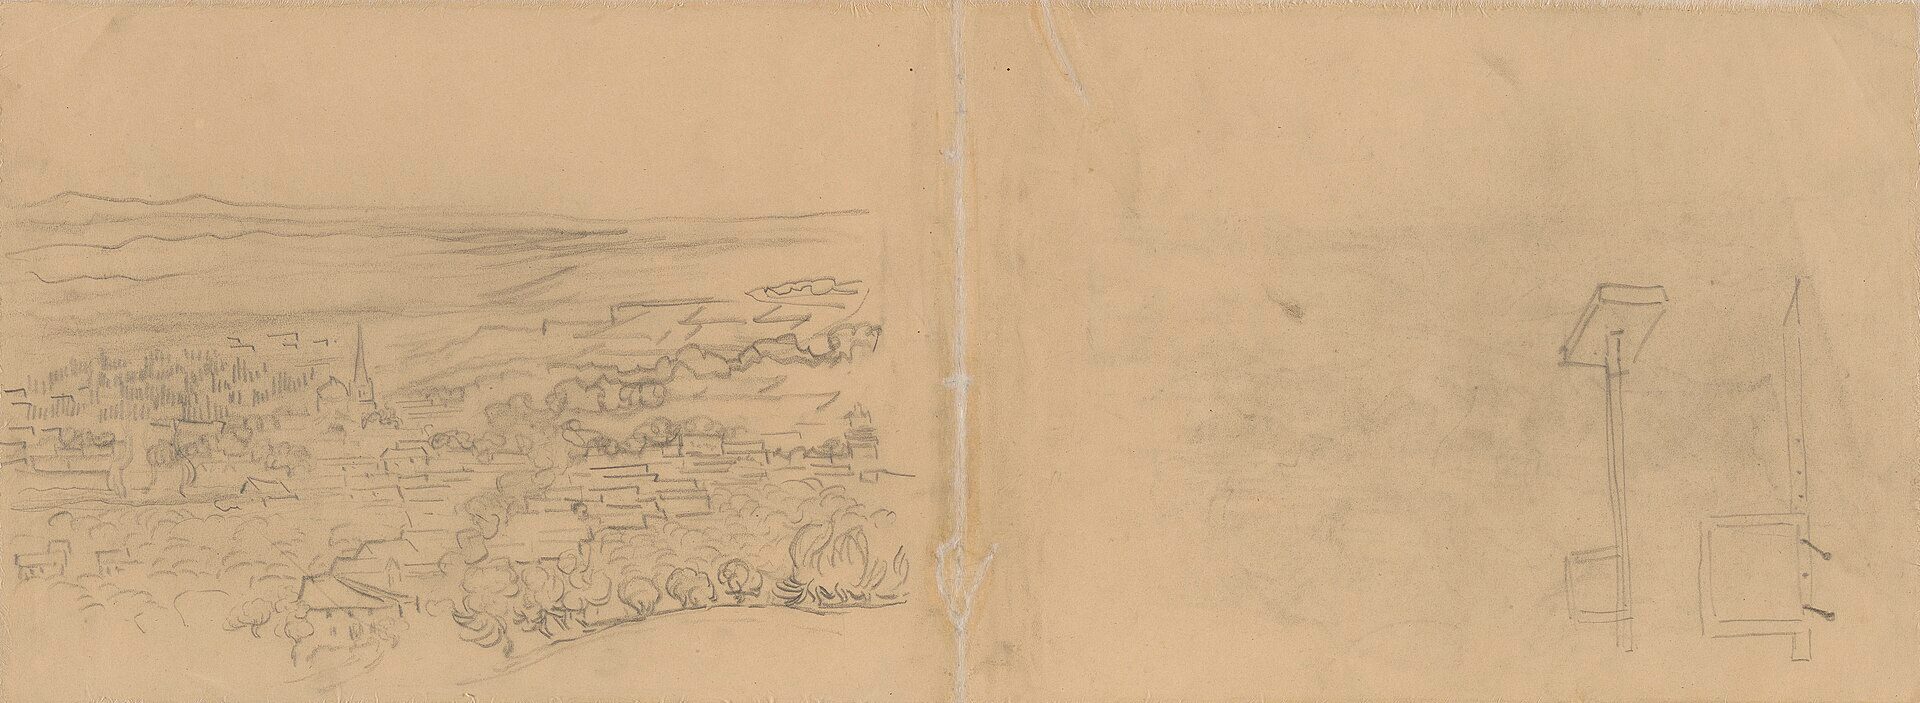
Vincent van Gogh's sheet with a bird's-eye view of a village and, at the right, sketches of the perspective frame he used to check converging lines when drawing from life. Public domain, via Wikimedia Commons. Image: Vincent van Gogh (Public domain (verified))
Step 2: Line weight
Go over the construction with three weights. Use the heaviest line for the building’s outline against the sky and the ground, a medium line for the edges of major planes such as the corner and the roof edge, and the lightest line for windows, joints and surface texture. Leave the construction lines faint; they show how the drawing was built.
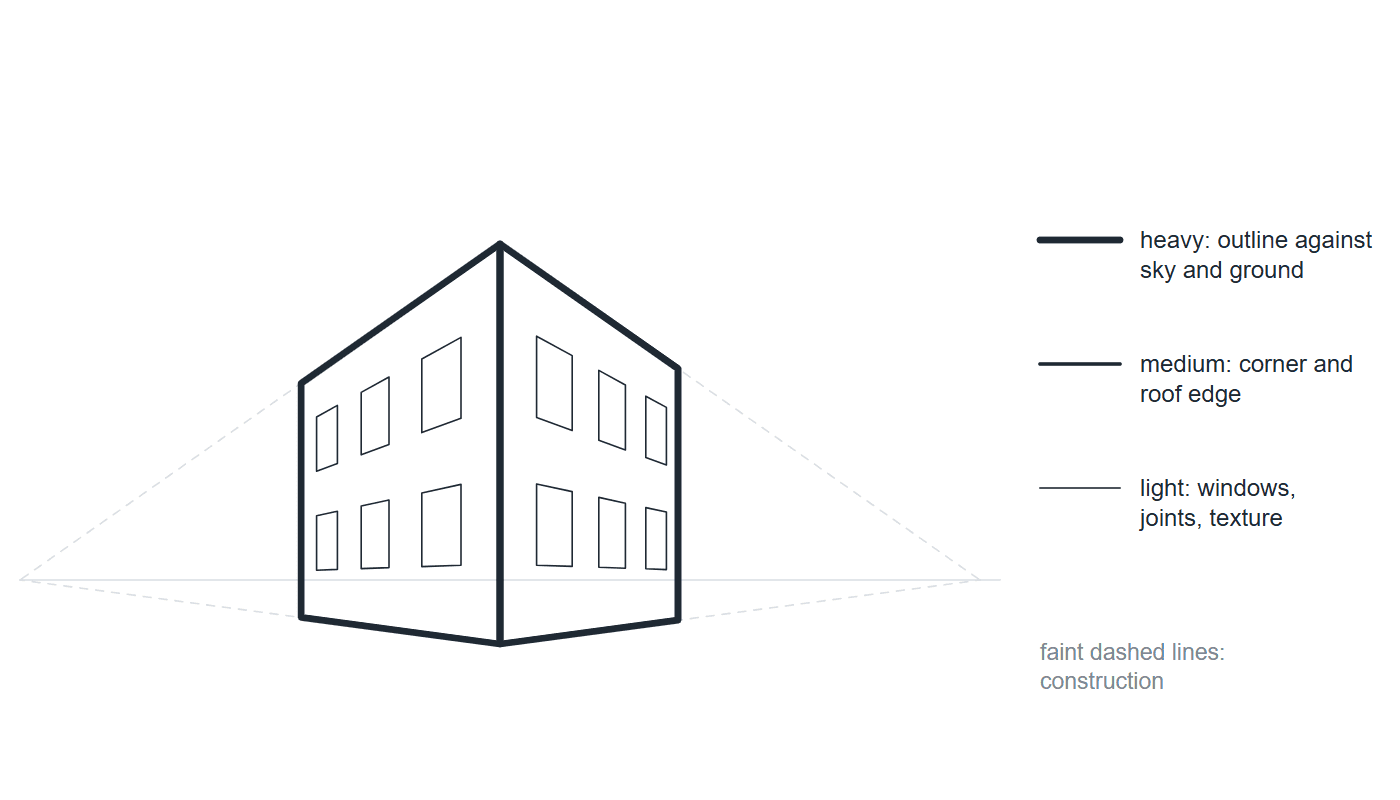
Step 2: three line weights on the same corner block: heaviest for the outline against sky and ground, medium for the corner and roof edge, lightest for windows and joints. Construction lines stay faint. Diagram: Arch2O
Step 3: Light and shade
Decide where the sun is, then shade in three values. Leave the planes facing the light almost white, give the planes facing away a mid tone, and make cast shadows, under eaves, in window reveals and on the ground, the darkest. Three clear values make the volume read more strongly than many fine gradations.
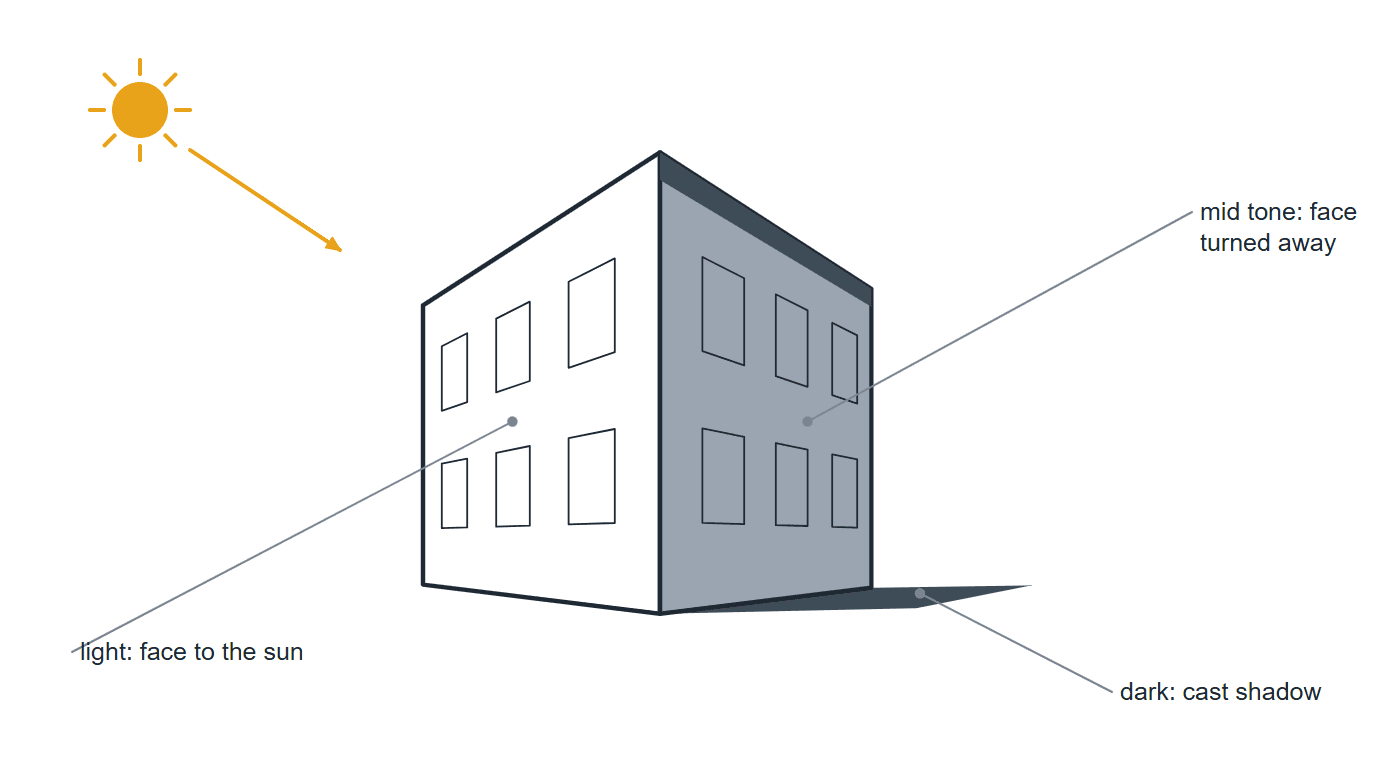
Step 3: three values of tone with the sun from the upper left: the lit face stays almost white, the face turned away takes a mid tone, and cast shadows (under the eave, in reveals and on the ground) are darkest. Diagram: Arch2O
Step 4: People and trees for scale
When the viewer stands on the same ground as the figures, adult heads sit on the horizon line at every distance, so you only change the height of the bodies below the line. Add two or three figures at different depths and one or two trees, using the silhouette check from tip 8. Keep them lighter than the building’s outline so they explain the scale without competing with it.
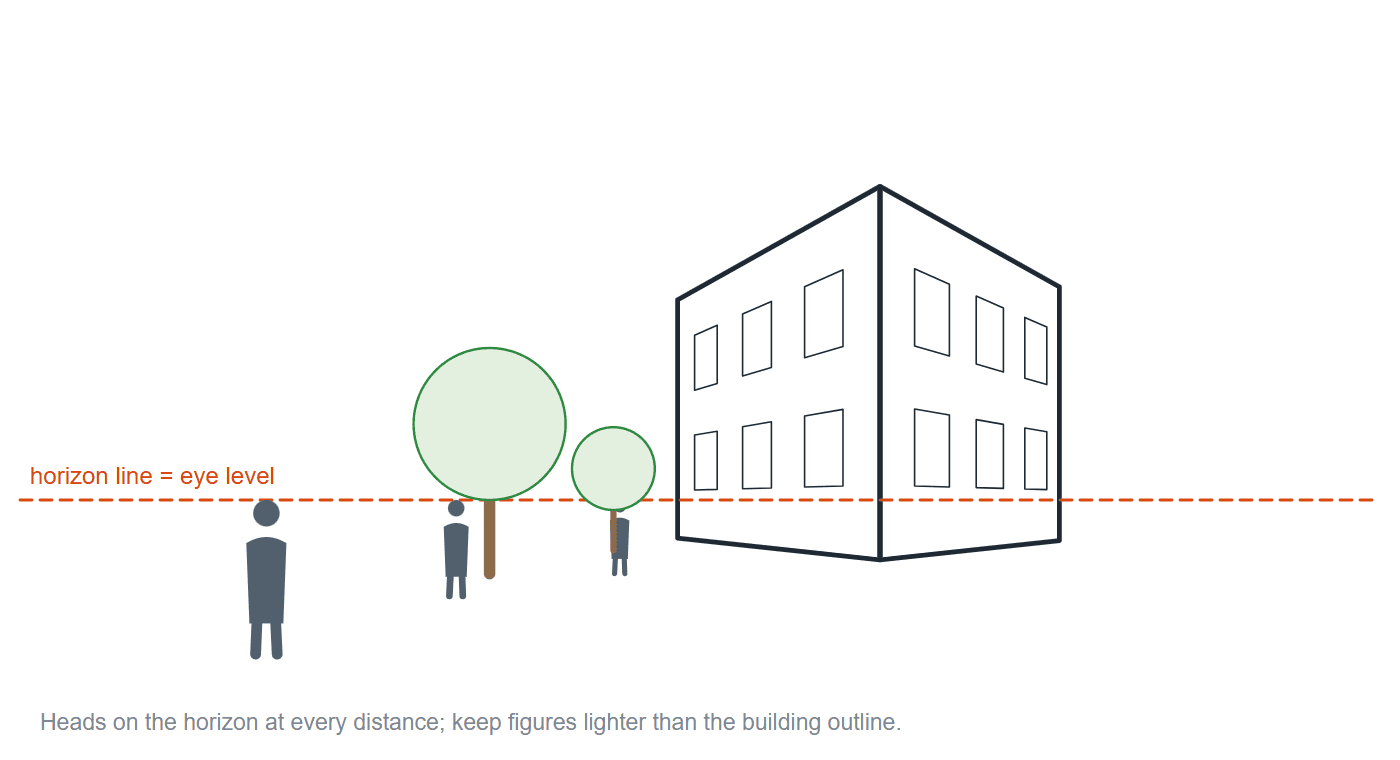
Step 4: people and trees for scale. With the viewer standing on the same ground, every adult's head sits on the horizon line; only the body below the line gets shorter with distance. Diagram: Arch2O
Repeat the sequence on a real building near you, then on a design of your own. Once the steps become automatic, the same drawing should take minutes rather than an hour.
Tools and apps for sketching
You need very little to begin architectural sketching: a few pencil grades (for example 2H, HB and 2B), one or two fineliners, a roll of tracing paper and an A5 or A4 sketchbook you can carry. Add a small watercolour set later. On a tablet, Sketchbook is free with a one-off US$2.99 premium bundle, and Morpholio Trace adds tracing-paper layers and scale tools with a free tier of up to five projects, according to their App Store listings checked on 24 October 2026. Digital sketches can then move into 3D; free SketchUp plugins help when you develop a sketch into a model.
Some architects sketch in other media entirely: Zaha Hadid explored early projects such as The Peak competition in Hong Kong through paintings rather than line drawings. Read more Zaha Hadid facts, and choose whichever medium lets you test an idea fastest.
Sources and further reading
- Bob Borson, Young Architect Guide: 5 Techniques to Improve Your Sketching (Architizer)
- Urban Sketchers: history and manifesto (Wikipedia)
- Francis D. K. Ching, Design Drawing (Wiley), for perspective construction and line weight in more depth
- Sketchbook and Morpholio Trace App Store listings, checked 24 October 2026

Ibrahim Abdelhady is an architect, academic, and media entrepreneur with over two decades of experience in architecture and digital publishing. He is the Founder and CEO of Arch2O.com, a leading platform in architectural media, renowned for showcasing innovative projects, student work, and critical discourse in design. Holding dual PhDs in Architecture, Dr. Abdelhady combines academic rigor with industry insight, shaping both future architects and architectural thought. He actively teaches, conducts research, and contributes to the global architecture community through his writing, lectures, and media ventures. His work bridges the gap between practice and academia, pushing the boundaries of how architecture is communicated in the digital age.