Back when you were a student at architecture school, Microsoft Excel was probably not on the top of your most used and mastered computer software. However, now as a graduate, practicing real-life architecture, you have most likely realized that you actually need this spreadsheet and graphing software you have been trying to avoid for a long – maybe you even wish someone told you this tip among other success tips for young architects! After all, there is no better tool you can use to compose a well-organized and formatted bill of quantities. And, if you are reading this, then you have probably thought that it is about time you learn more about Excel Formulas.
How do you write Excel Formulas?
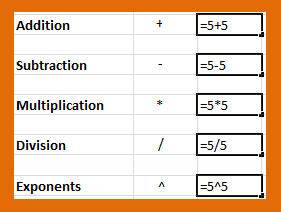
Excel uses standard operators for equations, such as a plus sign for addition (+), minus sign for subtraction (-), asterisk for multiplication (*), forward slash for division (/), and caret (^) for exponents. The key thing to remember when writing formulas for Excel is that all formulas must begin with an equals sign (=). This is because the cell contains—or is equal to—the formula and its value.
To create a simple formula in Excel:
- Select the cell where the answer will appear (B4, for example).
- Type the equals sign (=).
- Type in the formula you want Excel to calculate (75/250, for example).
- Press Enter. The formula will be calculated, and the value will be displayed in the cell.
-

If the result of a formula is too large to be displayed in a cell, it may appear as pound signs (#######) instead of a value. This means the column is not wide enough to display the cell content. Simply increase the column width to show the cell content. Excel might seem a bit confusing in the beginning, but once you get familiar with the basic formulae, tools, and shortcuts, you will find it quite handy.
What are the most used Excel formulas?
So, here we will help you get accustomed to it by providing you with a list of some of the most commonly used and quite helpful formulae that will get you started and rolling.
| 1. SUM | It sums all the values within a defined range, for single or multiple rows or columns. | =SUM(A1:F1)
=SUM(A1:A7) |
| 2. MIN | It gives the “smallest” value within a defined range. | =MIN(A1:F1)
=MIN(A1:A7) |
| 3. MAX | It gives the “largest” value within a defined range. | =MAX(A1:F1)
=MAX(A1:A7) |
| 4. AVERAGE | It calculates the average / Arithmetic mean for a defined range. | =AVERAGE(A1:F1)
=AVERAGE(A1:A7) |
| 5. COUNT | It counts the cells containing numbers within a defined range. | =COUNT(A1:F1)
=COUNT(A1:A7) |
| 6. COUNTA | It counts all non-empty cells within a defined range, regardless of the content. | =COUNTA(A1:F1)
=COUNTA(A1:A7) |
| 7. COUNTBLANK | It counts the empty cells within a defined range. | =COUNTBLANK(A1:F1)
=COUNTBLANK(A1:A7) |
| 8. IF | It gives one of two different outcomes depending on whether a condition is satisfied or not. | =IF(Condition, “if true value”, “if false value”)
=IF(A1<B1, “Yes”, “NO”) |
| 9. SUMIF | It operates the SUM only if a given condition is satisfied. | =SUMIF(B1:B7, “<100”) |
| 10. SUMIFS | It operates the SUM only if multiple conditions are satisfied. | =SUMIFS(B1:B7, B1:B7, “>10”, B1:B7, “<100”) |
| 11. COUNTIF | It counts cells with numbers that satisfy the specified conditions only. | =COUNTIF(A1:A7, “>10″) |
| 12. ROUND | It rounds numbers to a specified number of digits. | =ROUND(8.39,1)
. . 8.39 will be 8.4 |
| 13. ROUNDUP | It defines the direction of the rounding to upwards. | =ROUNDUP(8.39,0)
. . 8.39 will be 9 |
| 14. ROUND DOWN | It defines the direction of the rounding to upwards. | =ROUNDDOWN(8.39, 1) . . 8.39 will be 8.3 |
| 15. Floor | It rounds a number down to a specified multiple. | =Floor(B2, 1000)
e.g. 1350 will be 1000 |
| 16. Ceiling | It rounds a number up to a specified multiple. | =Ceiling(B2, 1500)
e.g. 1350 will be 1500 |